 – The Best VPN Service for Bloggers")
I’m going to talk about my favorite VPN service in this post.
My preferred VPN service provider of choice for a while now is NordVPN. And, I say it has come in rather useful for duties linked to blogging on multiple occasions.
Here are some of the things we’ll discuss in this NordVPN review:
- What is NordVPN
- How to use it
- How fast is it
- What else can it do
- How much it costs
What is NordVPN?
A well-known “Virtual Private Network,” or VPN, provider that may hide your real location and secure your connection is NordVPN. This can allow you access geo-restricted information and services and greatly increase your online privacy.
Within the VPN world, NordVPN is regarded as one of the top-tier and most reliable providers available.
In terms of features, coverage, speed, and stability, it provides the best value for the money. Sometimes, it might make more sense to use a different VPN service provider.
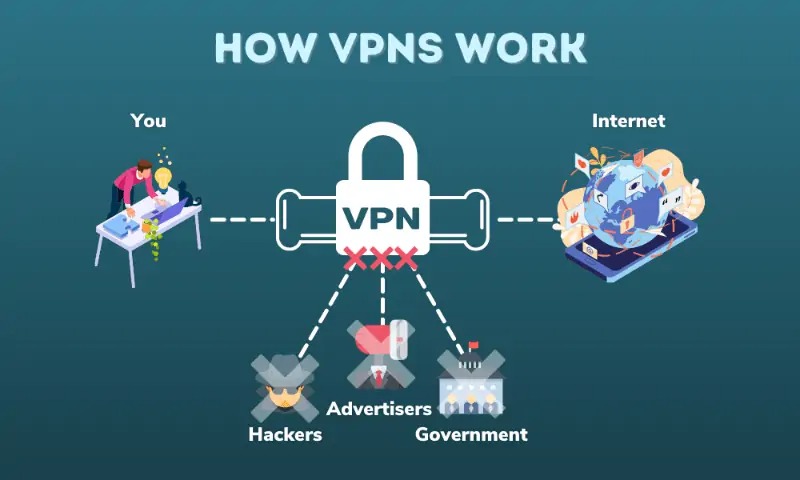
How do VPNs Work?
Virtual Private Networks, or VPNs, build safe tunnels that let users access the internet privately and securely. Service providers use a global network of servers that are dispersed throughout several places.
Specifically, NordVPN has more than 5,300 servers spread over 59 nations.

Although some VPN providers have more servers than NordVPN, keep in mind that server count isn’t always a reliable indicator of performance.
Undoubtedly, if you want people all over the world to enjoy a dependable and constant service, you should have a large number of servers. However, server quality becomes increasingly crucial once you have enough servers to cover vital areas.
Because of this, NordVPN exclusively makes use of devoted, fast servers.
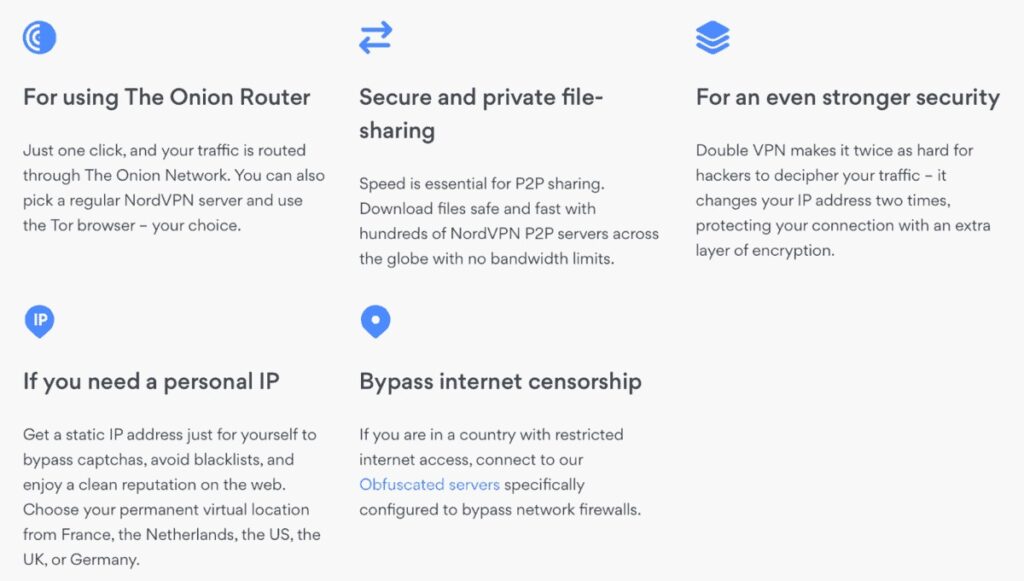
Additionally, they provide a variety of “Specialty Servers” tailored to particular requirements, such as file-sharing, deep web browsing, and enhanced security.
Ultimately, a spec sheet shouldn’t be your primary source of information when choosing a product.
Rather, you should consider its features, cost, real-world performance, and usability.
How to use NordVPN
Allow me to take you through the setup procedure for NordVPN to demonstrate how simple it is to use.
Step 1: Installing the NordVPN App
Installing a NordVPN plan on your device comes next after buying one.
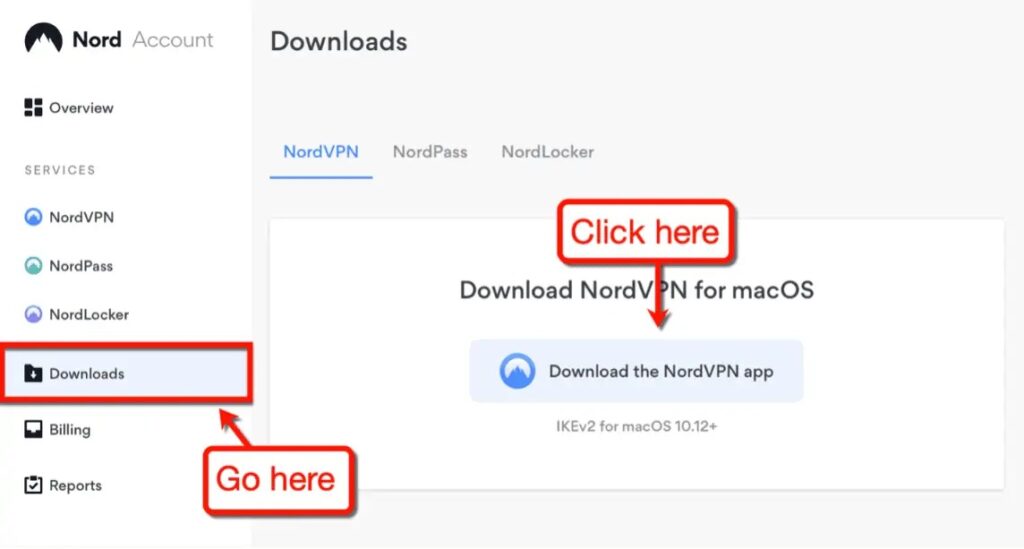
Simply visit the “Downloads” page, and NordVPN will suggest the appropriate version for you.
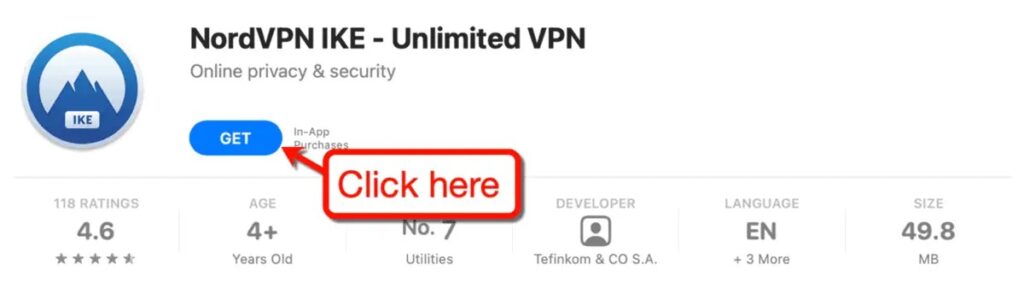
I had to download NordVPN for macOS in my situation.
That implies that in order to install it on my computer, I must use the App Store.
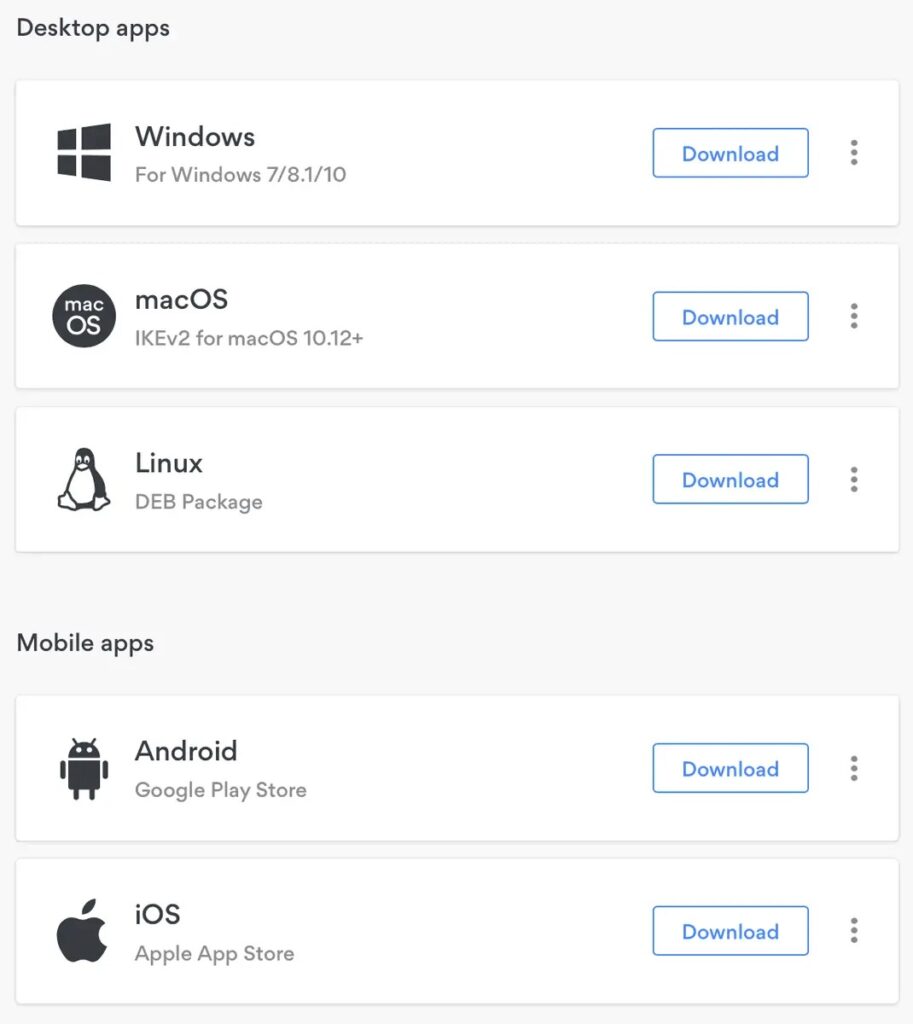
Apart from macOS, NordVPN also supports the following operating systems:
- Windows
- Linux
- Android (Mobile)
- iOS (Mobile)
- AndroidTV (Smart TV)
The “Downloads” page has the appropriate installation package that you can obtain.
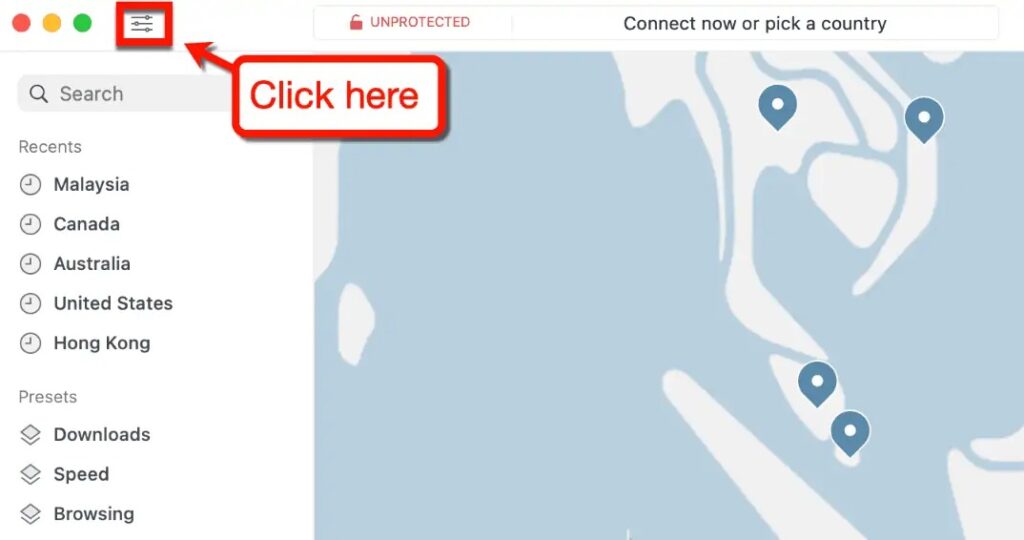
Step 2: Choosing a Connection
Expert users can adjust their VPN configuration after installation. It is recommended for beginners to use NordVPN’s settings, which you may activate immediately.
The connections list should now show these presets: browsing, speed, and downloads.
To continue, all you need to do is log into your account.
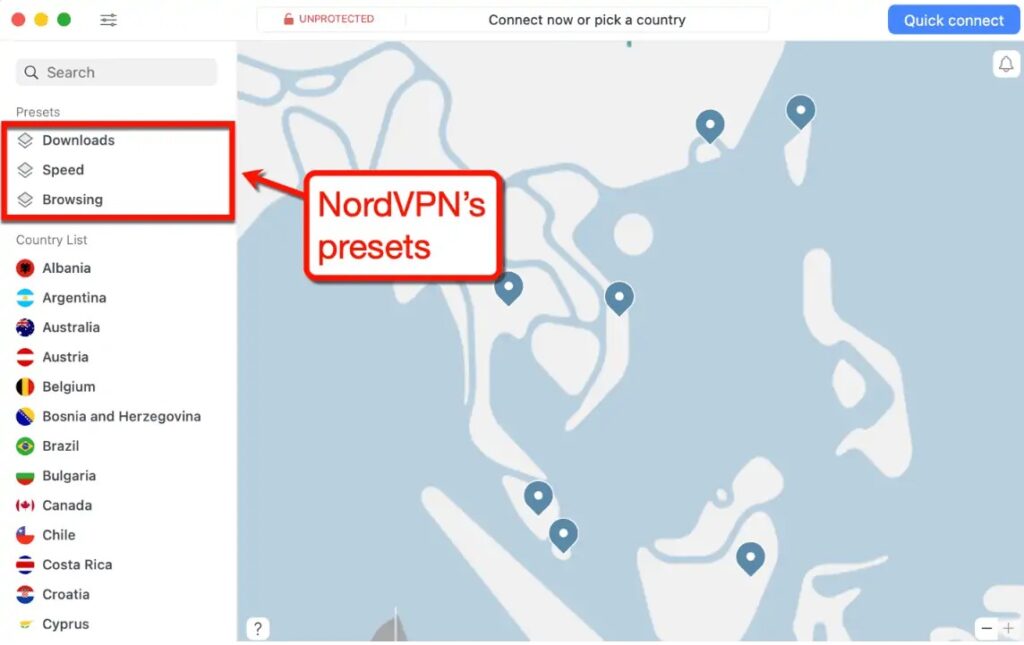
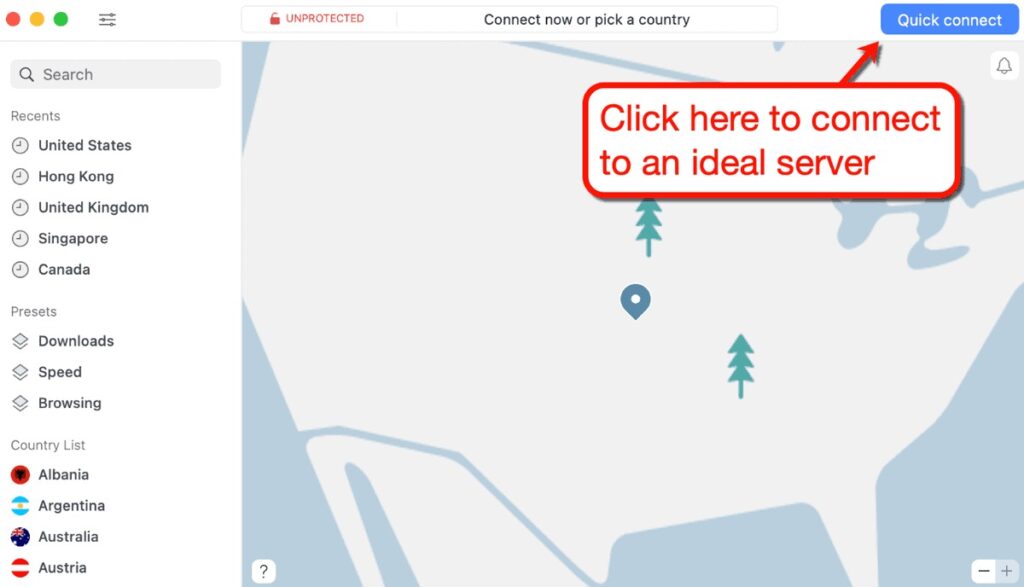
Click one of the settings, countries, or specialist servers to establish a VPN connection. Additionally, you may use the “Quick connect” option to let NordVPN choose the best connection for you.
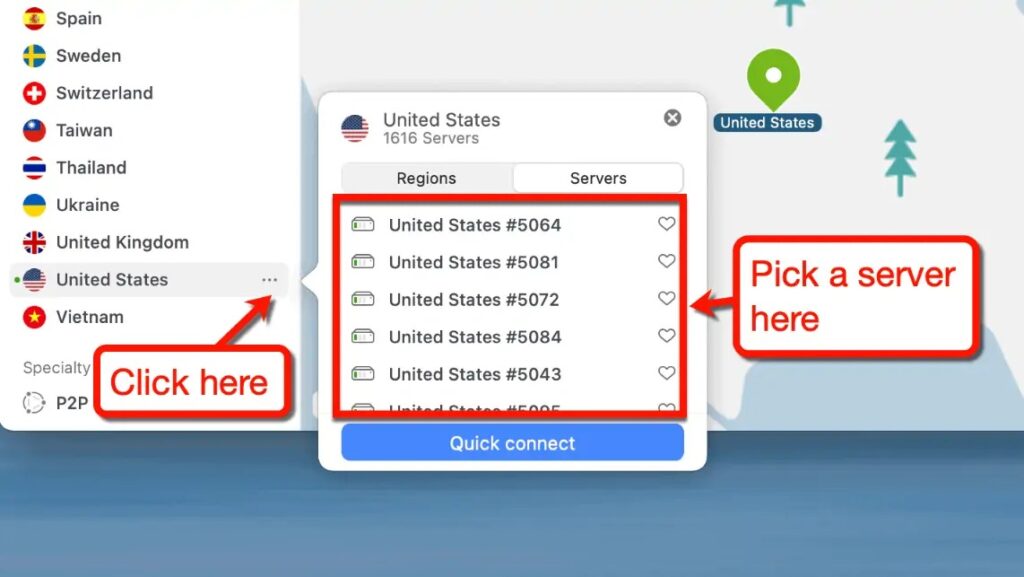
NordVPN will select a server for you automatically if you clicked on a country. You can also select a particular server by selecting the ellipsis next to the desired nation, if you’d like.
In large nations like the US, NordVPN allows you to select a certain area.
Once more, if you’d prefer not to manually go through the list of connections, you may simply select “Quick connect.” NordVPN needs to choose one for you automatically based on performance.
Step 3: Switching Connections on the Fly
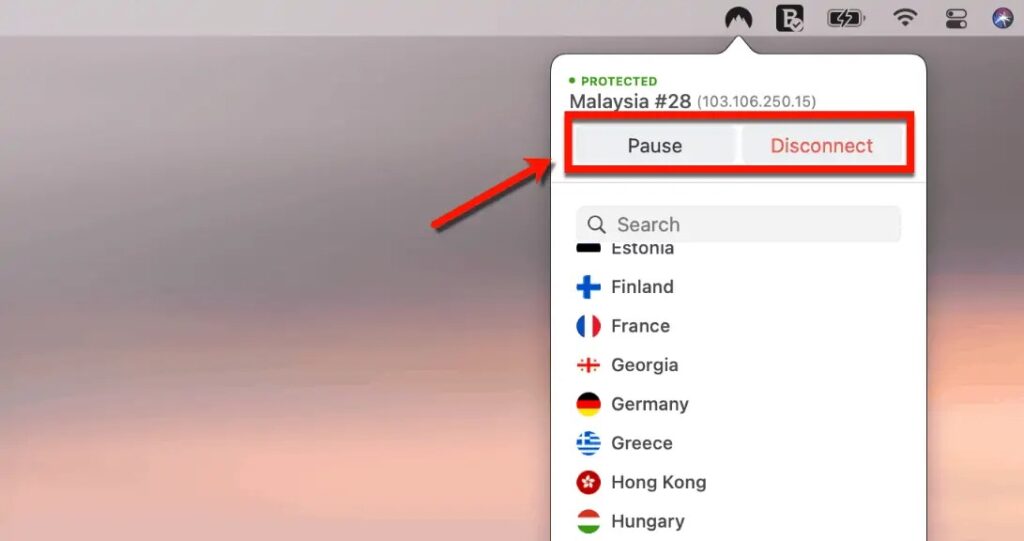
With NordVPN, you may rapidly switch between servers by using the icon in the menu bar (Windows System Tray).
All you have to do is click to see every connection that is accessible and select the server you wish to utilize.
It should just take a few seconds to complete the process.
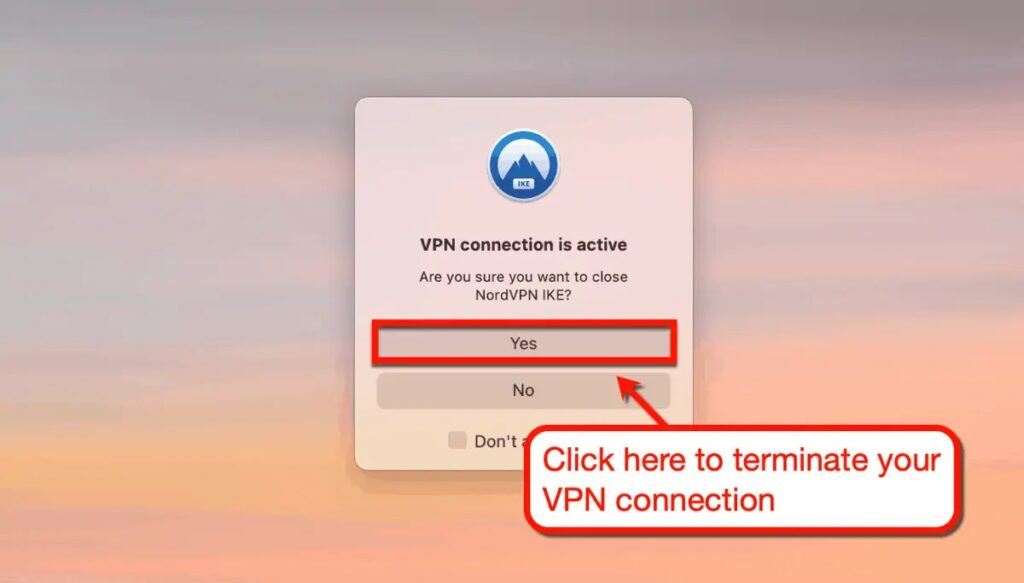
Step 4: Pausing or Disconnecting Your VPN Connection
Finally, the menu bar icon allows you to disconnect or pause NordVPN.
These choices should be at the top of the list.
As an alternative, you can terminate the NordVPN app and unplug from your VPN connection.
A notification from NordVPN will appear to remind you that your open VPN connection is about to expire.
To disconnect and exit the NordVPN app, select “Yes.”
The interface of NordVPN is incredibly user-friendly.
With only a few clicks, you may quickly switch servers and access all the functionality you require.
The interactive VPN map is a great addition, in my opinion.
It facilitates the process of finding VPN servers close to your location. However, a lot of users choose the server list because, on some systems, the map can feel difficult and slow.
How fast is NordVPN?
One of the main concerns for VPN users is connection speed.
Fortunately, utilizing NordVPN doesn’t require you to be concerned about poor connections.
Here’s a speed test of my connection with NordVPN turned off to give you an idea:
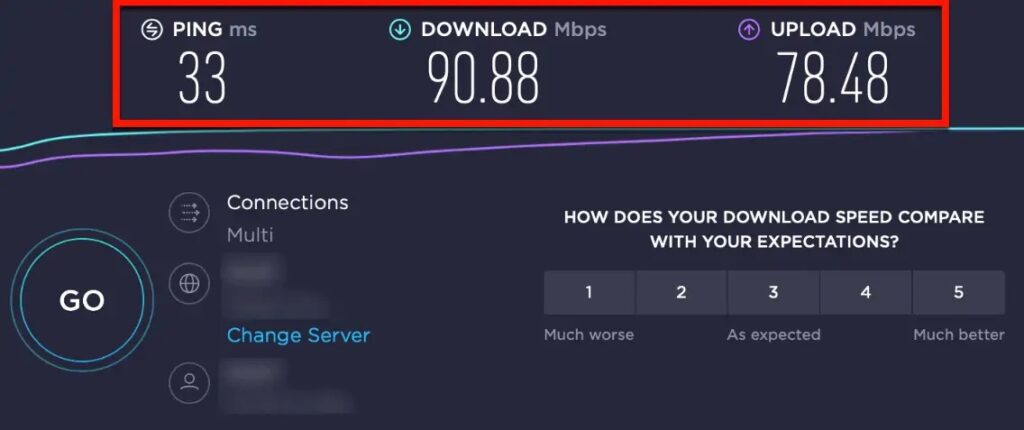
I am aware that my internet isn’t the fastest in the world.
That being said, it is relevant.
Following my connection to the suggested server of NordVPN, these are the results of my speed test:
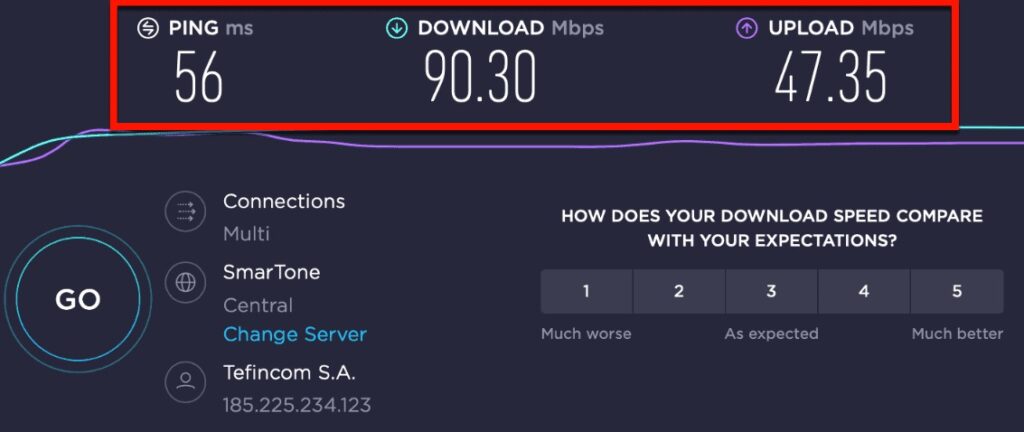
Note that SpeedTest.net identified that I’m connected to a foreign ISP in the second screenshot.
That is only NordVPN at work.
Additionally, note that the download speeds are about the same, save from the somewhat greater delay and slower upload speed.
When utilizing services like Netflix, YouTube, or Spotify, not even you will be able to identify that you are using NordVPN.
Configuring NordVPN
The “Preferences” box allows you to further personalize NordVPN and your experience.
To begin, simply select the ‘Preferences’ button from the NordVPN app’s UI.
You can then adjust NordVPN’s appearance, presets, basic settings, “Auto-connect” option, and other features.
Among the items you should consider are the following:
Using CyberSec and different VPN Protocols
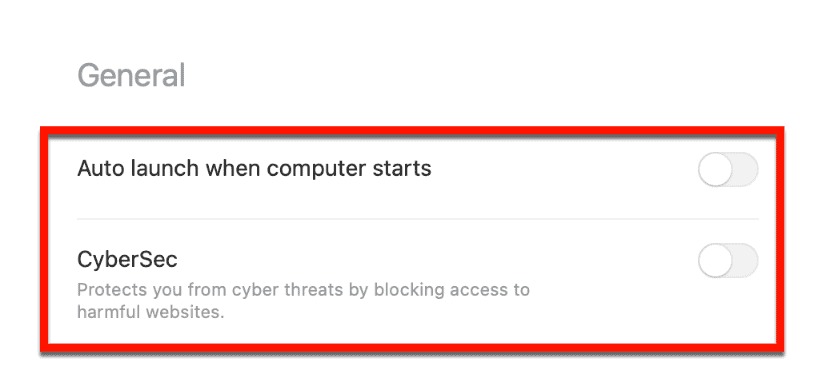
You may choose whether or not NordVPN should start up when your computer boots up by going to the “General Settings” tab.
Note that I’m presently use NordVPN’s macOS app.
The preferences window’s tabs and functionality will differ slightly between the Windows and Mac versions. With the exception of the “Split tunneling” option, the main functionalities should remain same.
Additionally, you have the option to activate “CyberSec,” which would proactively prevent access to fraudulent websites.
Always keep in mind that downloading anything harmed will not shield you from infection using a VPN. Also, if you use a VPN, it will get beyond whatever security measures your government has put in place to block known dangerous websites.
Having said that, if you wish to visit websites you aren’t acquainted with, I advise turning on CyberSec.
Additionally, you can choose a particular VPN protocol and consent to NordVPN collecting user data on the general settings page.
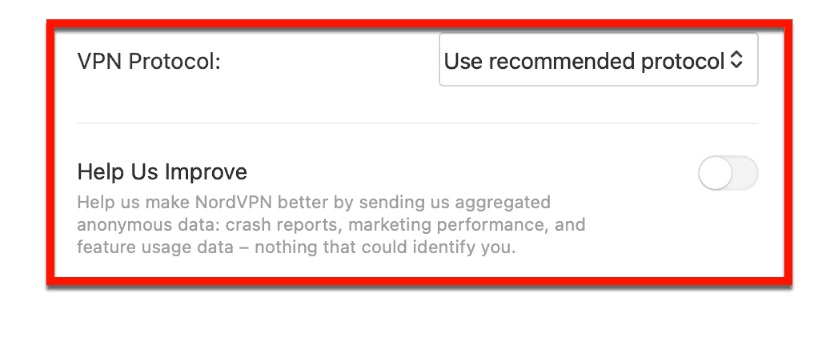
Currently, NordVPN supports the following VPN protocols:
- NordLynx
- IKEv2
- OpenVPN UDP
- OpenVPN TCP
Enabling the Auto-Connect Feature
There are situations when using an unreliable WiFi hotspot is your only option when working on the road.
When connecting to these networks, NordVPN can be set up to automatically patch you through a VPN.
All you have to do is click the toggle next to “When using untrusted network” on the “Auto-connect” tab.
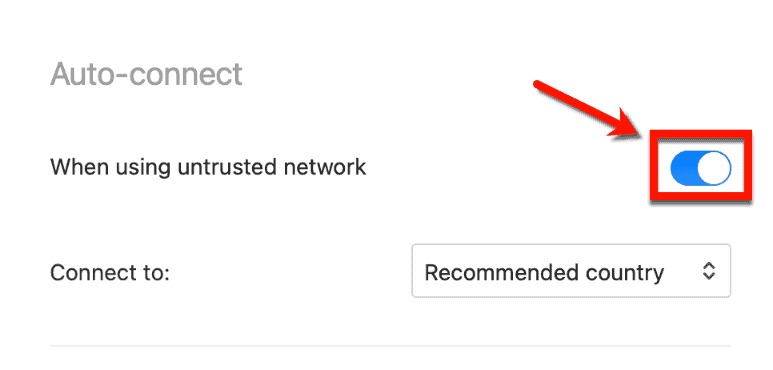
By default, NordVPN will establish a connection for you with a suggested nation. If you want to make sure that you always have a dependable connection when the auto-connect feature activates, you can leave this setting.
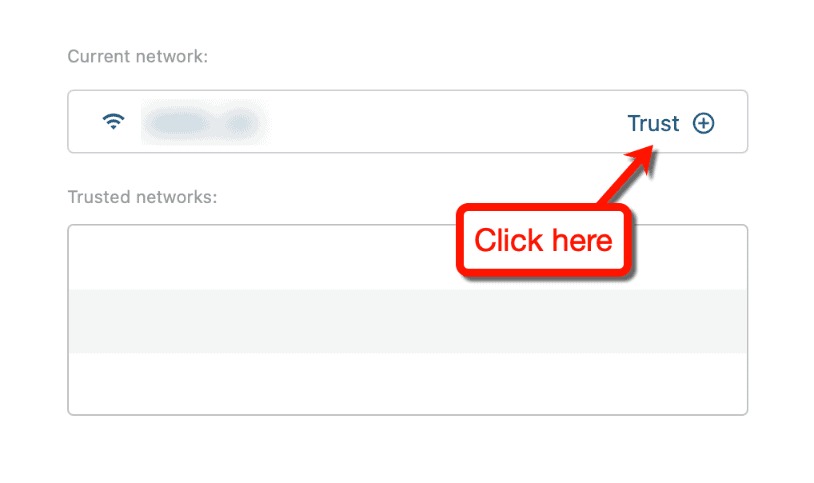
Just remember to include your reliable networks in the list below.
Clicking “Trust” next to the network you’re currently connected to will enable you to accomplish this.
Protecting Your Data from the Dark Web
Like every other top-tier security program, NordVPN has a capability called “Dark Web Monitor.”
This is a turnkey solution that will keep hackers away from your data. All you need to do to activate protection is click “Turn on.”
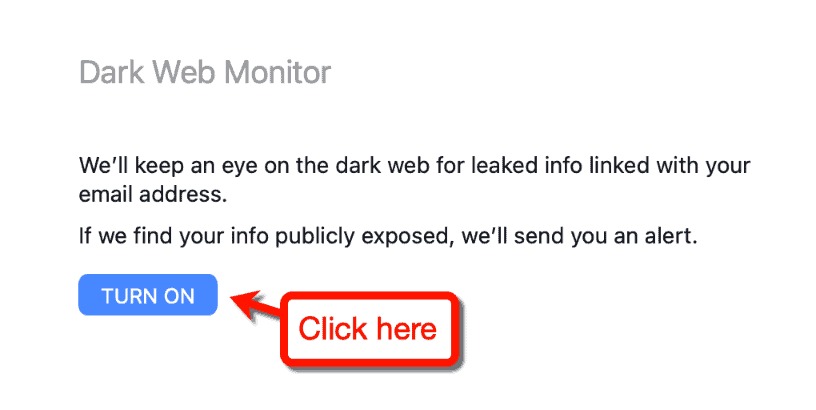
In order to find content associated with your email address, the Dark Web Monitor systematically searches the dark web.
It will notify you of any discovered data leaks that could have impacted you as soon as it becomes activated. You can then respond by changing your password or username and manually disabling the alerts.
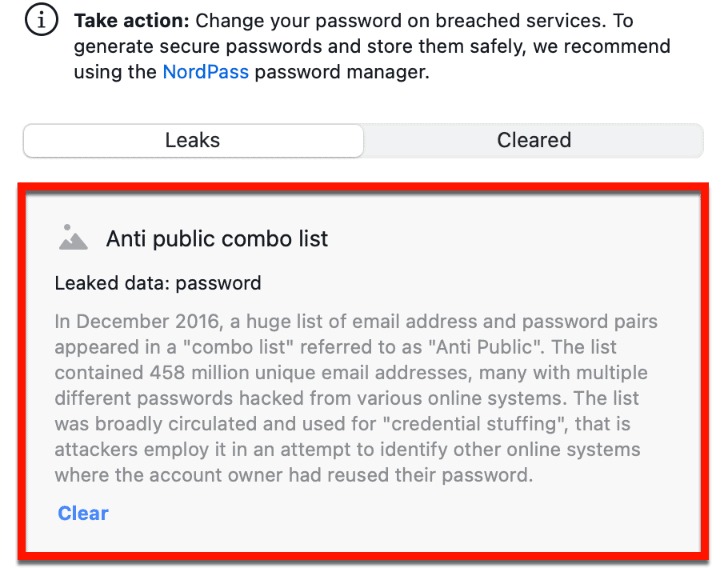
I also like that NordVPN provides an explanation of the circumstances that resulted in the data leak. This will assist in educating non-techies about the value of safe browsing techniques and password hygiene.
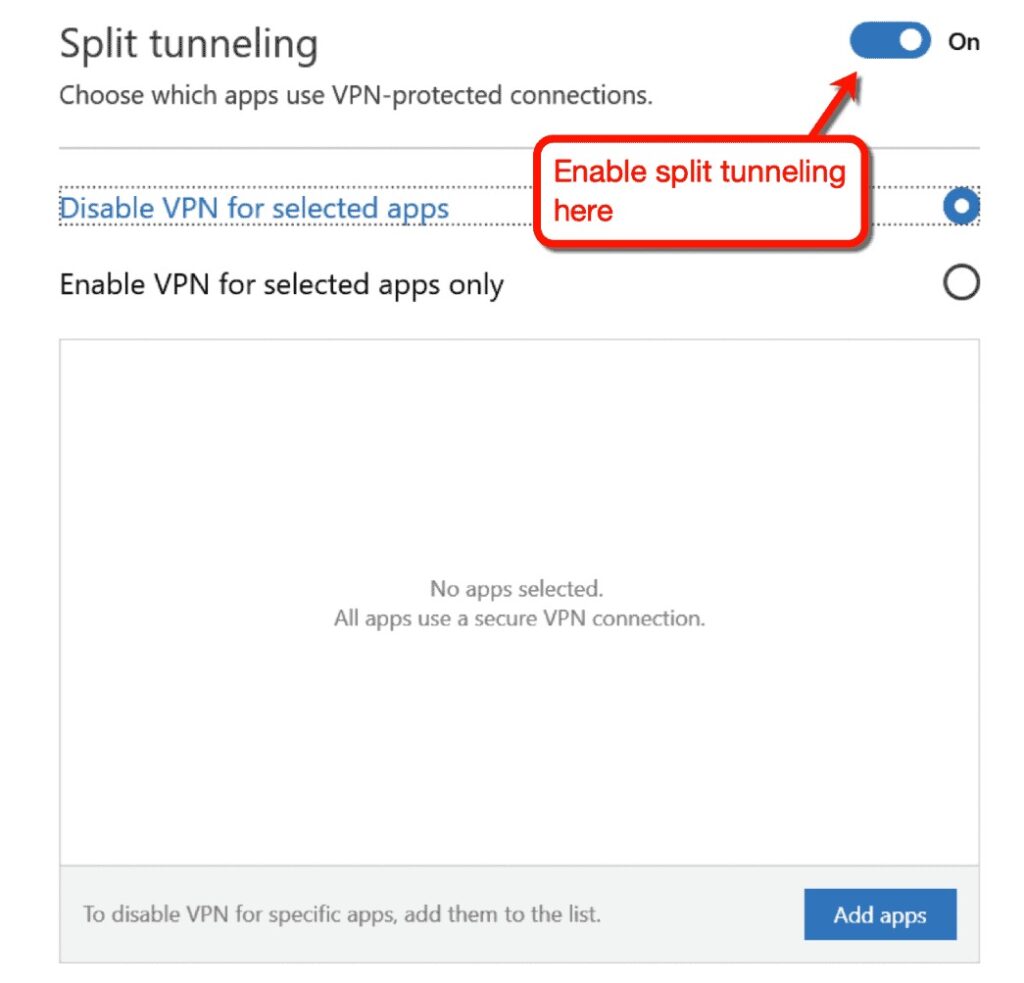
Split Tunneling (Windows Only)
The split tunneling feature of NordVPN is available to Windows 10 users.
This gives you the option to enable or disable your VPN connection for a subset of apps.
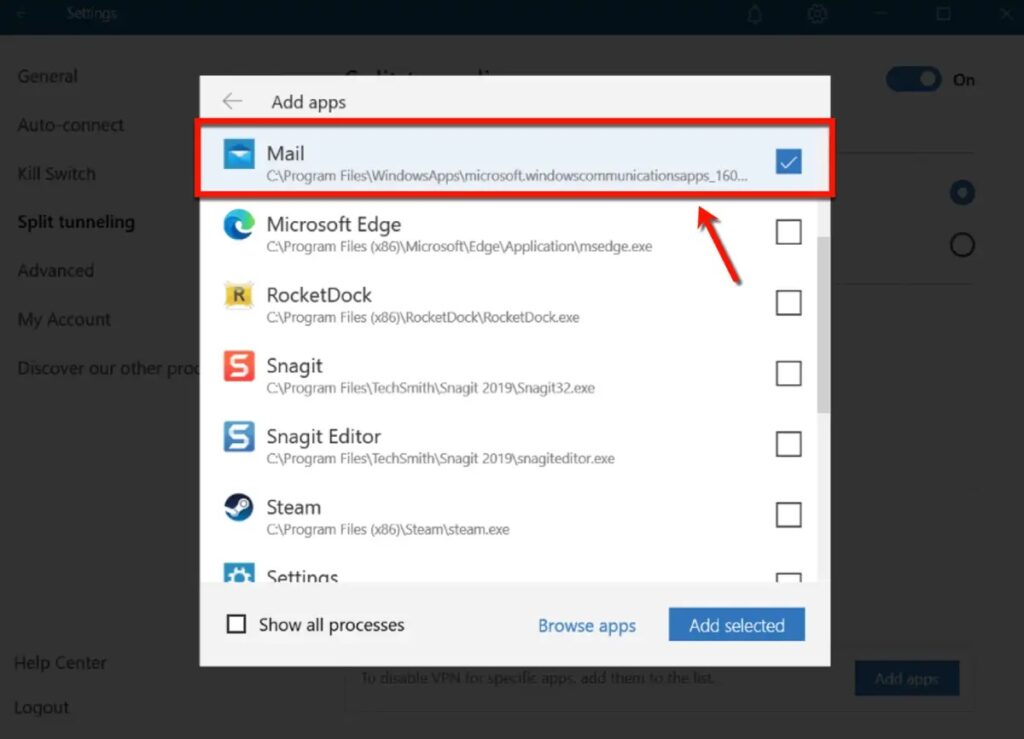
Simply select the split tunneling toggle under the ‘Split tunneling‘ menu to begin using it. Then, using the list below, you may designate which apps should use your VPN connection and which ones should not.
This is helpful if you simply need to utilize a VPN for particular tasks, such streaming or online banking.
It can also be used to stop specific apps from giving you trouble when using your VPN.
For instance, if your service provider notices that you’re connecting from a foreign nation, your mail app might not sync. Split tunneling can be used to solve this, as can turning off Windows Mail’s VPN.
Other Settings Pages You Can Access
The settings pages shown above should be all that a typical VPN user needs to be concerned about.
There are, however, a few other pages you can check out to maximize your NordVPN experience:
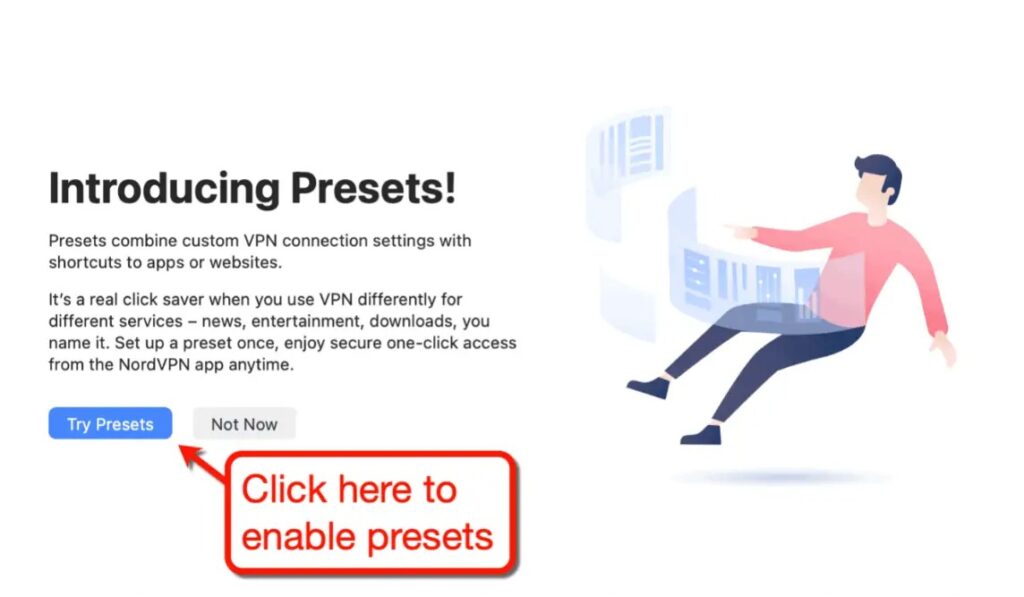
- Presets: You can utilize three settings that NordVPN automatically installs for different kinds of tasks. A personalized preset with links to your preferred programs and websites can also be made.
- Kill Switch: The “Kill Switch” function is activated by default to safeguard your information in the event that a VPN connection abruptly terminates. Additionally, you can activate the complex Kill Switch option, which increases security but may interfere with some application functioning.
- Appearance: You may select the locations from which to use the NordVPN app on the “Appearance” tab. Users of macOS only have access to this.
- Other Apps: Lastly, by selecting the “Other Apps” menu, you may examine more NordVPN services. This covers NordLayer, NordPass, and NordLocker.
Other NordVPN Services
Few VPN services offer add-ons that might further increase your online security.
That’s an additional justification for getting NordVPN.
You can get even greater online privacy with NordPass and NordLocker.
NordPass
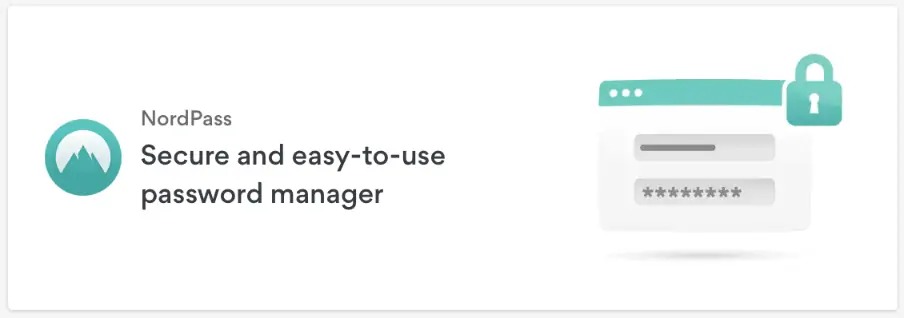
With NordPass, you can keep your passwords safe and automatically sync them with various devices.
Additionally, it has a function called “autofill” that saves your password so you don’t have to manually type it every time. Using strong passwords including symbols, capital letters, and digits is now simpler as a result.
There is a limited-edition free version of NordPass available. All you have to do to access the paid version is pay $1.49 a month minimum.
NordLocker
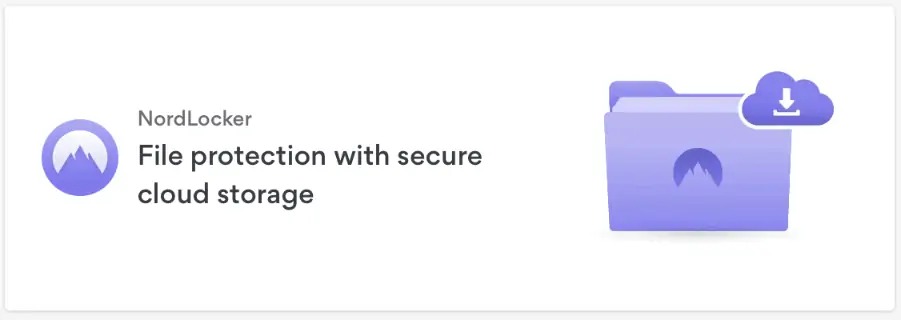
An encrypted cloud storage option is NordLocker.
You can access your encrypted files from any device as long as you are logged into your NordVPN account. Also, even they are unable to access the contents of your cloud storage due to NordLocker’s “Zero-knowledge encryption.”
Similar to NordPass, there is a free version of NordLocker. However, the premium edition costs $3.99 a month if you want 500 GB of storage and access to all services.
NordLayers
For businesses in need of the protection and anonymity features that a VPN can offer, there is NordLayer.
Clearly, not everyone is a good fit for NordLayer. But because it’s so inexpensive, it’s worth acquiring if you manage a large website with remote staff.
The “Basic” plan at NordLayer costs $7 per month for each user. To obtain priority assistance and dedicated servers, you must purchase the “Advanced” plan, which costs $9 per user.
NordVPN Pricing
After going over each of NordVPN’s salient characteristics, it’s time to respond to the query:
What is the price of it?
Although I wouldn’t classify NordVPN as a “budget” brand, it is undoubtedly affordable for customers on a tight budget.
Take a look at NordVPN’s affordable pricing plans:
- 1-Month Plan: $11.95 per month
- 1-Year Plan: $4.92 per month
- 2-Year Plan: $3.67 per month
Conclusion
One of the few things that really changed my internet usage is NordVPN.
It will probably be very helpful for you as well, I’m ready to bet.
In addition to having the finest security measures available, NordVPN also has some of the best usability and performance in the VPN industry.